资源下载
资源下载

在Arduino上添加wifi

文件列表(压缩包大小 50.34K)
免费
概述
本教程将会向您展示如何通过添加ESP8266 WiFi模块将您的微控制器连接到互联网。
需要的元件
Arduino UNO
杜邦线

电阻(10k、1k)

Arduino IDE
原理及流程
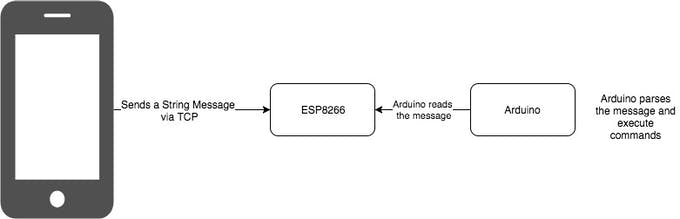
有很多方法可以使用ESP866进行通信。有些人可能会用它来在线发送/接收数据或定期上传数据。在本教程中,我将仅向您展示如何使用您的手机(Android或iPhone)与Arduino无线通信。这将脱机完成,因此不需要互联网连接。
我们的ESP8266将用作接入点(AP模式),这意味着它将为其他设备(站)提供对Wi-Fi网络的访问并将它们进一步连接到有线网络
这个过程很简单。使用手机将命令发送到Arduino。借助ESP8266,一切将以无线方式进行。
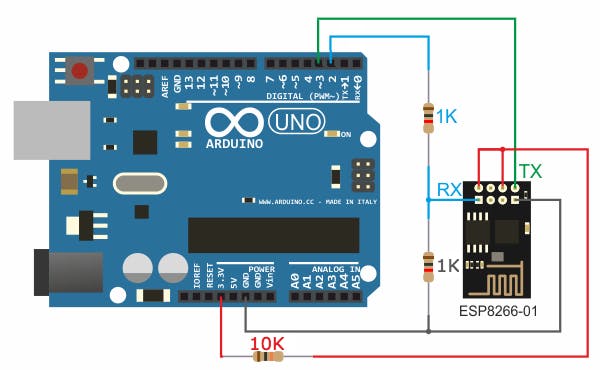
电路示意图
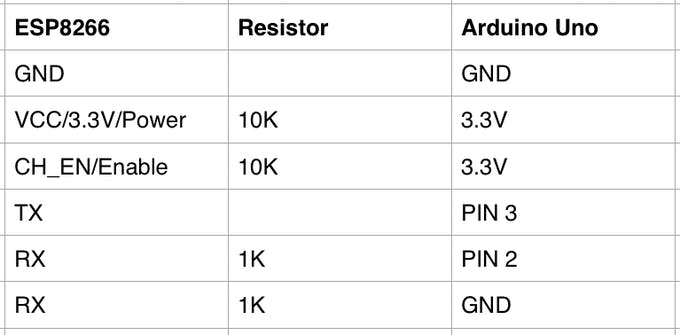
按着这些次序连接电路:
- 将ESP的VCC / 3.3V /电源引脚和使能引脚(红线)连接到10K电阻,然后连接到Uno的+ 3.3V电源引脚。
- 将ESP的地线/ GND引脚(黑线)连接到Uno的地线/ GND引脚。
- 将ESP的TX(绿线)连接到Uno的Pin 3
- 将ESP的RX(蓝线)连接到1K电阻,然后连接到Uno的引脚2。
- 将ESP的RX(蓝线)连接到1K电阻,然后连接到Uno的GND引脚。
建立连接
一切设置完成后,您会注意到ESP8266 Wifi在手机范围内可用。
1 .下载适用于Android的TCP客户端
您可以下载Play商店中可用的任何TCP客户端,我使用的是Sollae Systems的TCP Client
2 .从手机连接到ESP8266 Wifi
如果未从可用的wifi网络中显示ESP8266 wifi,请确保您的Arduino正在运行并且一切都正确连接。如果不是,请按照其文档对ESP进行故障排除。
通常wifi / ssid的名称会以ESP的版本名称开头,而我的名称是ESP11。
3 .连接后,获取静态IP地址。
你可以通过转到手机的Wifi设置来检查ESP的IP,然后单击网络信息。AP模式下的默认IP地址为192.168.4.1 。你可以通过遵循此Wifi.config()参考来更改静态IP 。
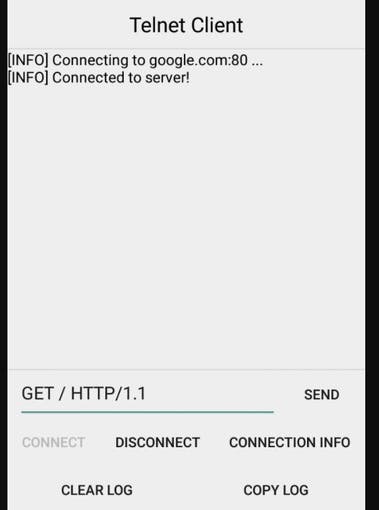
4 .打开您先前下载的TCP客户端。
通过单击connect创建连接,添加ESP的IP和端口80,如下所示:
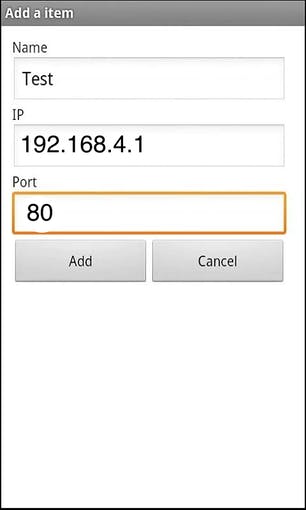
80是我用我们的ESP服务器的端口,你可以将其改成任何你想要的端口
**5.**等待TCP控制台说“已连接”。
通过智能手机与Arduino Uno交流
连接后,通过向TCP客户端键入以下代码来发送请求:
esp8266: <any AT Commands>
通过Attention命令或AT命令与ESP8266进行通信。
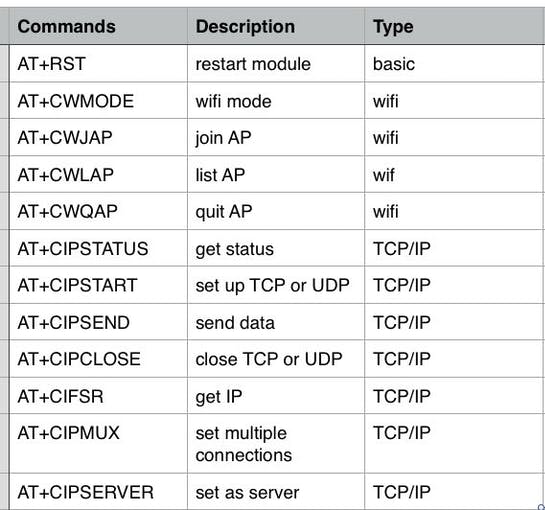
检查所附的“ AT命令”表以查看代码。
或使用命令打开内置LED
LEDON
或使用命令关闭内置LED
LEDOFF
或者只是说
HELLO
您可以根据发送到代码中的逻辑来更改发送的响应。
重要说明:esp8266,LEDON,LEDOFF和HELLO是我的自定义命令标识符。如果您未放置任何其他内容,它将返回ErrRead。
ErrRead表示没有与您发送的消息匹配的命令标识符。
ErrRead消息在代码第64行。
关于电路
ESP11上的ESP电源引脚标有VIN,但对于某些版本,它可能是3.3V或Power或VCC。
你还需要为ESP的CH_EN引脚或Enable引脚供电,以使其起作用。
重要事项ESP使用的电压不要****超过3.3VC
ESP8266严格使用3.3 V电压,否则会损坏模块。
由于Arduino的电压为5V,因此我不得不安装一个分压器。这里用了电阻器。
ESP的TX连接到Uno的RX,这意味着我们要在ESP中发送(TX)的任何内容都将由Uno接收(RX),反之亦然。
构建此电路后,我们现在就可以使用Arduino UNO启动WIFI了。
注意:如果通过USB电缆连接串行调试器或打开COM端口,则ESP和Arduino之间的通信将受到干扰,无法正常工作。
因此,在刷新Uno之前,请先删除ESP的Rx / Tx。
关于代码
重要说明:ESP8266有不同类型。请根据您的ESP8266的使用情况,更改第16行所附代码的波特率。
我们所有的请求都将在loop()函数中读取并解析。
if(wifiSerial.available()>0){
   String message = readWifiSerialMessage();
   if(find(message,"esp8266:")){
      String result = sendToWifi(message.substring(8,message.length()),responseTime,DEBUG);
     if(find(result,"OK"))
       sendData("\n"+result);
     else
       sendData("\nErrRead");               //At command ERROR CODE for Failed Executing statement
   }else
   if(find(message,"HELLO")){  //receives HELLO from wifi
       sendData("\\nHI!");    //arduino says HI
   }else if(find(message,"LEDON")){
     digitalWrite(13,HIGH);
   }else if(find(message,"LEDOFF")){
     digitalWrite(13,LOW);
   }
   else{
     sendData("\nErrRead");                 //Command ERROR CODE for UNABLE TO READ
   }
 }
从上面可以看到,我使用了我的函数find(
如果你想与Arduino UNO交流或要求做一些事情,只需添加你的条件即可。例如 :
if(find(message,"MY CODE")){
     // I found 'MY CODE' from received message
     // lets do something here
}
if(find(message,"A")){
     // I found 'A' from received message
     // lets do something here
}
我增加了一些功能来与ESP8266通讯。
/*
* Name: sendData
* Description: Function used to send string to tcp client using cipsend
* Params:
* Returns: void
*/
void sendData(String str){
 String len="";
 len+=str.length();
 sendToWifi("AT+CIPSEND=0,"+len,responseTime,DEBUG);
 delay(100);
 sendToWifi(str,responseTime,DEBUG);
 delay(100);
 sendToWifi("AT+CIPCLOSE=5",responseTime,DEBUG);
}
/*
* Name: find
* Description: Function used to match two string
* Params:
* Returns: true if match else false
*/
boolean find(String string, String value){
 if(string.indexOf(value)>=0)
   return true;
 return false;
}
/*
* Name: readSerialMessage
* Description: Function used to read data from Arduino Serial.
* Params:
* Returns: The response from the Arduino (if there is a reponse)
*/
String  readSerialMessage(){
 char value[100];
 int index_count =0;
 while(Serial.available()>0){
   value[index_count]=Serial.read();
   index_count++;
   value[index_count] = '\0'; // Null terminate the string
 }
 String str(value);
 str.trim();
 return str;
}
/*
* Name: readWifiSerialMessage
* Description: Function used to read data from ESP8266 Serial.
* Params:
* Returns: The response from the esp8266 (if there is a reponse)
*/
String  readWifiSerialMessage(){
 char value[100];
 int index_count =0;
 while(wifiSerial.available()>0){
   value[index_count]=wifiSerial.read();
   index_count++;
   value[index_count] = '\0'; // Null terminate the string
 }
 String str(value);
 str.trim();
 return str;
}
/*
* Name: sendToWifi
* Description: Function used to send data to ESP8266.
* Params: command - the data/command to send; timeout - the time to wait for a response; debug - print to Serial window?(true = yes, false = no)
* Returns: The response from the esp8266 (if there is a reponse)
*/
String sendToWifi(String command, const int timeout, boolean debug){
 String response = "";
 wifiSerial.println(command); // send the read character to the esp8266
 long int time = millis();
 while( (time+timeout) > millis())
 {
   while(wifiSerial.available())
   {
   // The esp has data so display its output to the serial window
   char c = wifiSerial.read(); // read the next character.
   response+=c;
   }
 }
 if(debug)
 {
   Serial.println(response);
 }
 return response;
}
/*
* Name: sendToUno
* Description: Function used to send data to Arduino.
* Params: command - the data/command to send; timeout - the time to wait for a response; debug - print to Serial window?(true = yes, false = no)
* Returns: The response from the esp8266 (if there is a reponse)
*/
String sendToUno(String command, const int timeout, boolean debug){
 String response = "";
 Serial.println(command); // send the read character to the esp8266
 long int time = millis();
 while( (time+timeout) > millis())
 {
   while(Serial.available())
   {
     // The esp has data so display its output to the serial window
     char c = Serial.read(); // read the next character.
     response+=c;
   }
 }
 if(debug)
 {
   Serial.println(response);
 }
 return response;
The story
通过这个项目你已经了解了如何通过Wifi与Arduino Uno进行通信,现在可以探索更多的物联网项目。
最后
所有需要的文件在下载区均可找到。
理工酷提示:
如果遇到文件不能下载或其他产品问题,请添加管理员微信:ligongku001,并备注:产品反馈

评论(2)

0/250
 饮水思源 • 9899 对资源的评价
下载后的评价
很赞
2021-01-16
回复
下载后的评价
666
2022-07-12
回复